Last Updated on February 20, 2023 by Justin
If you want to learn how to record electric guitar at home, then this is the place to be. I’ll show you the best techniques that are used by some of the world’s most famous producers and engineers.
Contents
An electric guitar is capable of a wide range of sounds. And, is unique in that the amplifier and the speakers are as much a part of the sound as the instrument itself.
This means that to record the “true” sound of the electric guitar, you ideally need to capture the sound coming from the speakers with microphones.
The concept of recording electric guitars is completely different from that of recording acoustic guitars for multiple reasons. The frequency and dynamic range are different.
Also, the types of microphones and techniques are also different as you’ll discover below.
Analog vs Digital Recording: How to Record on PC and Mac
Nowadays, pretty much everything is recorded digitally. Mostly because of the convenience as well as the fact that it requires a lot less hardware in comparison to traditional analog set-ups.
In my opinion, the sound quality is not affected if you decide to record digitally. Just make sure all your recording equipment is up to par and you should be good to go.
DAW (Digital Audio Workstation)
I should point out that if you are going to be recording electric guitars digitally on a computer, then you will need a DAW (Digital Audio Workstation).
This is the software that allows you to capture and mix your recordings. I personally use Reaper. It is just a personal preference, however, Some of the most popular and best DAW for recording guitar include:
- Pro Tools
- Logic
- Cubase
- Ableton
- Garageband
- Reason

Audio Interface
In order to take an analog signal and convert it into a digital signal, you will need an Audio Interface. If you are just going to be recording one thing at a time, then I recommend an interface with a few channels.
If you are going to be recording many inputs at a given time, then upgrading to a unit with more inputs makes sense. It is very important to note that you will not be able to record your electric guitar on a PC or Mac without an Audio Interface.
Everyone from the bedroom recorder to the biggest studios in the world has an audio interface. If you’re looking for the best one, my choice is always the Scarlett.
Amp Modelling vs Miking vs Profiling
Amp modeling effects and units such as The line 6 Helix, Boss GT series of multi-effects, or Native Instruments Guitar Rig software can offer a quick and easy way to record an electric guitar with decent tone and offer a range of amp tones to choose from.
More recently, the Kemper profiler has caused quite a splash in the guitar recording community. As this unit is capable of producing an almost life-like sound of literally any amp you can think of.
However many players are more comfortable with a real amplifier. And, will give their best performance when using one. There is nothing quite like the visceral pleasure of playing through a loud valve amplifier.
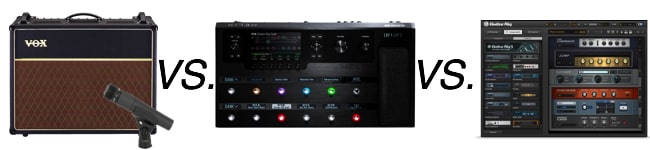
For the purposes of this tutorial, I am going to focus on how to record electric guitar at home using a microphone. Simply because, the amp models and simulators are pretty self-explanatory and once plugged in, require little further instruction.
Whereas with microphone techniques, there are different techniques one can employ to achieve different sounds etc. Also, recording guitar amps are the most organic sounding in my opinion.
Best Microphone For Recording Electric Guitar
A dynamic mic such as a Shure SM57 or a Sennheiser MD421 is very often used to record electric guitar at home and in the studio.
The reason that dynamic microphones are preferred over condenser mics is that the dynamics can handle the volume levels and have enough frequency range to cope with the limited response of an electric guitar amp.
Below are some of my best microphones for recording electric guitar:
a) Shure Sm57
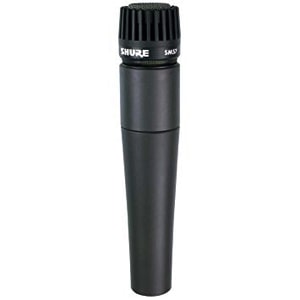
As far as microphones go, this is one of those legendary guitar amp mics that tick all the boxes.
Furthermore, they’ve been used to mic up a guitar amp and cabs both for live purposes as well as in the studio, ever since their inception decades ago.
b) Sennheiser e609 – Best microphone For Recording Guitar Amps
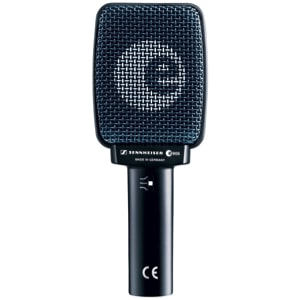
I’m in love with this microphone. Purley because it was designed for the sole purpose of recording guitar amps and cabinets.
Having said that, I much prefer this mic for live recording instead of studio recording.
c) Sennheiser MD421

For me, this Sennheiser MD421 is the best SM57 alternative out there. It is also, in my opinion, a better premium option.
Simply because it is able to record a much larger range of frequencies which is just perfect for recording electric guitars.
Firstly, Make Sure The Amp Sounds Good
The single most important detail in getting great electric guitar sounds is that the sound coming out of the amp should be great. This is determined by the guitar, amp & speakers, and the person playing it.
It is much easier to get a good recorded sound if the guitar/amp setup is a good-sounding one. And making sure that the guitar sounds good first, can save you a lot of time later.
So make sure the guitar is free from buzzes and rattles, the strings are relatively new and the intonation is set properly.
Also, make sure the amplifier is in a good state of repair. Valve amplifiers also need to be maintained, with new valves every few years. And more extensive overhauls every fifteen years or so. Any problems with noisy pots or jacks should be sorted out before you go into the studio.
Electric Guitar Microphone Techniques
It is important to remember the point made above: the amp and speakers are part of the instrument and should be treated as such.
Open-backed guitar cabinets emit sound from both the front and the rear of the cabinet, and you must often capture both to reproduce the real sound of the amp.
The key to getting a great guitar sound is to constantly experiment, trying lots of things until you get the sound that is most pleasing to your ears.
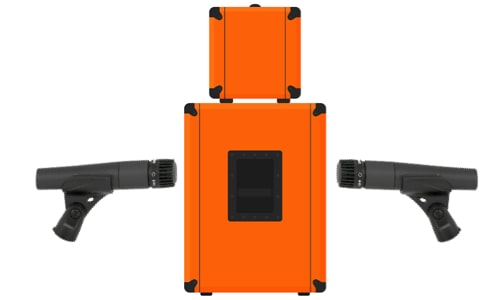
Usually, a guitar amp is miked close up with the mic up against the grille of the amp the way you do on stage – this is the quickest way to capture a dry isolated sound that will It also pays to add in an ambient mic a short distance away from the amp and finally with a room mic a few meters away.
This gives you a range of sounds to play with. In the smaller home recording studio or those with an unflattering room sound, you may want to omit using the room mic.
If you are going to use a room mic, take time to find a spot in the room where the amp sounds good and a spot distant from the amp which sounds good.
Use those sophisticated measuring instruments of yours (your ears) and walk around the room listening for “sweet spots” where the amp sounds good – you’ll know them when you find them.
Try different mics, try moving them closer and farther, try different angles, try putting the amp in a corner, try putting the amp on a concrete floor, try it on a wood floor, try it on a floor with carpeting – basically just try everything you can think of!
Close mic
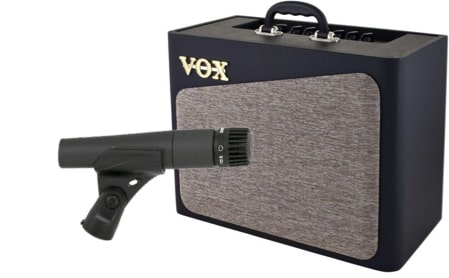
The close mic gives a dry, punchy, detailed sound. Usually, a dynamic mic such as a Shure SM57 or a Sennheiser MD421 is used as the close mic as dynamics can handle the volume levels and have enough frequency range to cope with the limited response of an electric guitar.
Set up the mic right against the amp’s grill cloth, pointing it straight at the speaker cones will give a clearer, more detailed sound, but with more highs and a harsher edge.
Angling the mic slightly will soften the tone at the expense of a little detail and highs, and moving the mic towards the edge of the speaker will result in a mellower sound, as will moving the mic away from the cloth slightly.
Close Mic Multi Speaker Cabs and Mics

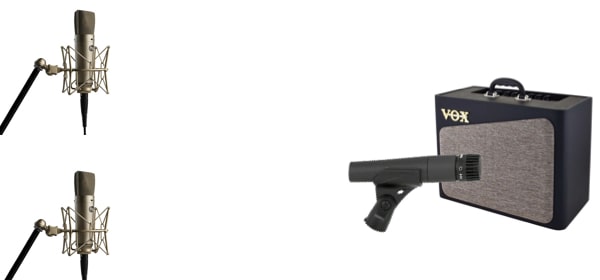
Close miking multi-speaker cabinets – Speakers vary a little, so if the amp has a multi-speaker guitar cabinet, listen to each to see which has the better sound and close-mic that one.
Usually, there is nothing to gain by micing more than one speaker, unless the cabinet has different speaker models which each contribute something different to the tone – then you should mic both.
If both speakers on my amp are the same, then I like to take two different microphones and place them on each speaker. I do this using the close mic technique above. This gives me two different tonal characteristics from the same amp.
Ambient mic
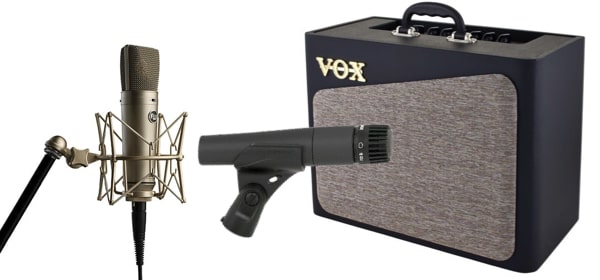
A mic placed a few inches to a few feet back can fill out the sound and create interesting tonalities. Just be careful of the delay (approximately 1 ms per foot or 3 ms per meter) which causes phasing – canceling certain frequencies when mixed with another mic, which can be pleasing or horrible, depending on the frequencies canceled.
So experimenting with distances is very important. If you are recording to a DAW (Digital Audio Workstation), it is possible to sidestep any phasing issues while keeping the ambient mic’s tonality by dragging the recorded track into alignment with the other mic tracks.
Room Mic
For the room mic, place a condenser mic anywhere from half a meter to two meters in front of the amp (at the same height as the amp) and point the mic at one of the speakers.
The further the mic is from the amp, the more bass and less midrange it will have. More room sound will be picked up – making the sound bigger.
If you have enough tracks on your recorder, print each mic to a separate track (if possible) to be able to decide the balance between them later, otherwise mix them to the desired balance when recording to a single track – just be careful not to add in too much room mic.
Record A Simultaneous Dry Signal with DI Box
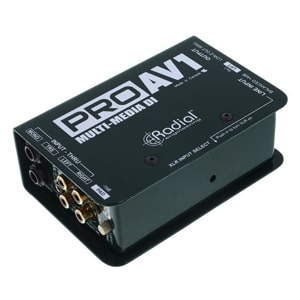
A very useful tip I picked up over my years of home recording is to make use a separate but simultaneous dry signal. Essentially, whilst plugged into the guitar amp.
I like to split my signal so that I have the guitar amp sound as well as a completely dry and clean guitar sound coming straight from a DI box. The clean signal lets me take a completely unaffected sound, essentially without any guitar tone, and allows me to reprocess or re-amp the sound after recording, using my DAW.
With the DI signal, I usually add effects and run it through different plugins and digital amplifiers for a variety of sounds afterward.
This signal is almost never used as my main recorded guitar sound. But, it is an incredibly useful thing to have. Especially if you want to go back and rework certain parts without having to go through the whole microphone process again.
Processing
In this section, we will cover the various steps that need to be taken In order to process the audio we have just captured using the steps outlined above.
Compression
Use compression on the close mic. Set the compressor at a 3:1 ratio and adjust the threshold so that the compressor is usually working, but not squashing the signal too much.
Note, this is not the same as using a compressor pedal for guitar. Here, I’m referring to using compression on the microphone which is a completely separate entity.
Equalization
The Electric guitar is not a natural instrument, so the only EQ rule is: Get the sound you want!
- Adding 100Hz – 250Hz will give you more bottom, and rolling off 300Hz – 500Hz will eliminate some of the nasal quality.
- Adding a touch of 700Hz will create a throaty or woody sound, adding a pinch of 1K will give the guitar more edge,
- Adding 3K will give the guitar more bite, and adding 5, 8, or 10K will make it brighter.
Doubling Guitar Parts
Doubling a rhythm guitar and panning the two tracks hard left and right can make the guitars sound huge. But consider what works best for the song.
Is the rhythm guitar the featured instrument, or will there be several other guitars competing for space in the stereo spread? Sometimes less is more.
If you do decide to double the guitar, think about altering the sound on the double track to give you more thickness. You can change guitars and keep the amp the same, or vice versa.
Change pickup settings if using the same guitar on the second track. EQ the two tracks differently (scoop mids out from one and boost the bass and treble, and do the inverse for the second guitar).
Make sure the performance is really tight though, matching the first track’s phrasing. Otherwise, you might end up with a cluttered mix that would be better off with only one track of guitar.
Mixing
Start with the close mic – this should comprise the bulk of your guitar sound. If it sounds good as it is, stop and don’t add any room or ambient mic – just because you have the extra mic tracks, doesn’t mean you have to use them (but rather have them and not need them than need them and not have them).
For a slightly more distant, but fuller sound, bring up the fader on the ambient or room mics. Slowly add those signals to the close sound. You’ll have the detail of the close mic, but with the fullness that comes with adding some “room” sound to it.
You don’t need to mix the guitar much louder than the other instruments or with more distortion to make it sound big. It’s all about how well you record it, to begin with. If you’ve done that right you’ll be in great shape for the mix.
Hey, fellow guitar mate! I’m Justin, I have been a professional guitarist since 2012. I have traveled the world playing on different stages alongside some of the best indie bands, at some of the biggest music festivals in the world. As a result, I’ve played lots of different guitar gear. Instead of keeping that knowledge to myself, I have set up this site to share my honest reviews of various guitar gear. But most notably, my love for guitar picks.