Last Updated on February 18, 2024 by Justin
If you want to learn how to record acoustic guitars at home in a budget-friendly way, without compromising on quality and sound, then read on as I uncover a simple guide to help you get the most out of your home recordings.
The acoustic guitar remains one of the hardest instruments to record and get a great sound. It has a wide frequency spectrum, and a large dynamic range, and the sound you get is very dependent on the player.
You can spend long, frustrating hours getting the perfect sound and recording it – but it can be worth it.
Furthermore, there are so many variables that come into play. Which, will affect the overall sound and tone of the recording. A well-recorded acoustic guitar is a joy to hear. So, let’s take a look at what you need to know…
Contents
Setting Up The Acoustic Guitar For Recording
The setup of a guitar is crucial to getting a good recorded sound. The sensitive condenser mics usually used will pick up any flaw and amplify it, so the better the guitar sounds acoustically, the better it will sound recorded.
Make sure the acoustic guitar is properly set up with no fret buzz or tuning issues. If any problems of this nature, get it professionally sorted out.
But first and foremost: use new strings. Old strings are duller sounding and also prone to tuning and intonation problems. New strings should have a 24-hour “break-in” period before recording, as this will let them settle tuning-wise and mellow some of the extreme high ends which can make the sound too brittle.
Some modern brands of strings are polymer-coated and sound a few hours old immediately and keep that “new string sound” for a lot longer.
Always keep some String Glide or similar product nearby for those times when “string squeak” is an issue. Dusting fingers with talcum powder will help in a pinch too.
I should also mention that if you are recording a classical guitar then you should take into other considerations. Such as the nylon strings and the quieter sound in which they produce.
For the most part, this guide is geared toward acoustic guitars with steel strings. However, the same principles will apply for classical guitars. You might just have to turn up the volume and/or gain to compensate for quieter strings.
Best Microphone For Recording Acoustic Guitar

There are rules set in stone, but a condenser mic will almost always give a better-recorded sound than a dynamic mic. The extra sensitivity and extended frequency range of a condenser mic capture the quieter elements and subtle high-frequency detail of the sound.
My favorite is the KM 184 by Neumann. Many engineers will opt for a small diaphragm condenser. A large diaphragm mic may also be used but will lose a little of the finer detail of the sound.
Recommended mics: Rode NT5, Oktava MC012, AKG C1000, Neumann KM 184, and the Shure SM57.
Guitar Pickups For Recording Acoustics
Piezo pickup systems are a godsend for playing live, as they give an acoustic sound with little chance of feedback, but they are not as natural sounding as a microphone.
Having said that, there are sometimes when you want an unnatural sound or even a blend of mic and pickup.
If a guitar has a pickup, I will usually record it at the same time as the mic’d sound (making sure it is recorded to another track!), and then decide during mixdown how much (if any) piezo signal I want blended in. I’d rather have it and not need it…
One thing with this technique: you will get phase cancellations between mic and pickup, so experiment with moving the mic closer and farther from the guitar until you get a well-combined sound.
Miking Acoustic Guitar Techniques
Getting the sound you want by choosing the correct microphone and mic placement will produce far better results than EQing an unsuitable tone.
An acoustic guitar produces some of its sound from the neck, the entire length of the strings, and even the back and sides of the box, so the mic needs to be a little distance (30 – 50cm) away to capture this accurately.
It is tempting to put the mic closer to the guitar to get a better signal level, but don’t – this will make the sound boomy. Similarly, If you point the mic directly into the sound hole, it will pick up too much of the sound coming from the hole and be much too full sounding.
One mic placement trick is to use your ear as if it were the mic – get down on your knees and move your ear around. You should find “sweet spots” where the sound is better.
Single Mic Placement

Place the mic about 30 – 50cm from the guitar’s sound hole, and angle it toward the area where the neck joins the body.
Move it towards the body for a warmer sound and moving it toward the neck will produce a brighter sound.
Also, experiment with moving the mic upwards, so it looks down on the guitar or downwards, looking up.
Stereo Mics
If you are recording solo guitar or small acoustic-based ensembles, you may want to record in stereo to enhance the depth and reality of the recording.
When using two mics, bear in mind the “3-to-1 rule” – the distance between two mics should be at least three times the distance between each mic and the sound source (there is one exception – the X – Y technique mentioned later).
This keeps phase cancellations to a minimum, resulting in a smoother sound that also translates well to mono. So, if the mics are 30cm from the guitar, make sure they are at least 90cm apart from each other.
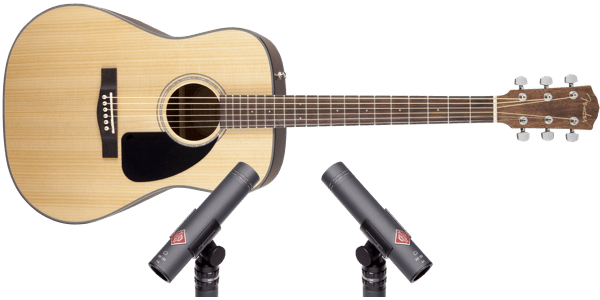
Spaced Pair
Two mics are placed apart from each other at the same approximate height, one pointing at the 12th fret of the guitar and the other at the bridge.
If you’re not getting the sound you want with a spaced pair placement, try moving one or both microphones slightly to improve the timbre.
Because spaced pair placement is subject to phase interference, moving one mic only an inch or two can dramatically change the sound.
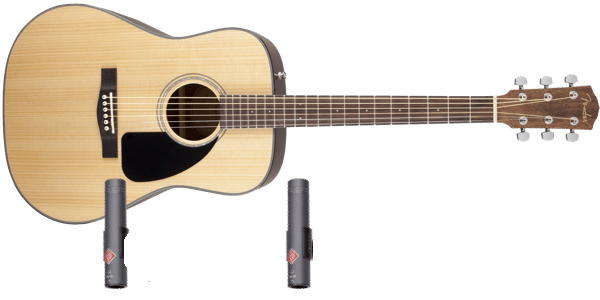
Spaced Pair Variation

As in the setup above, one mic points to the 12th fret. The second mic is hung from a mic stand at the performer’s ear level, pointing down at either the bridge or at the strings just behind the soundhole.
So if the performer is right-handed, this second mic would be placed over the right shoulder. You can also move this ear-level mic slightly out in front of the player.
And angle it back towards the guitar (versus pointing straight down at the floor), for a brighter sound. This technique usually yields a more open – but thinner – sound than the simple spaced pair on a horizontal plane.
X-Y, or coincident-pair
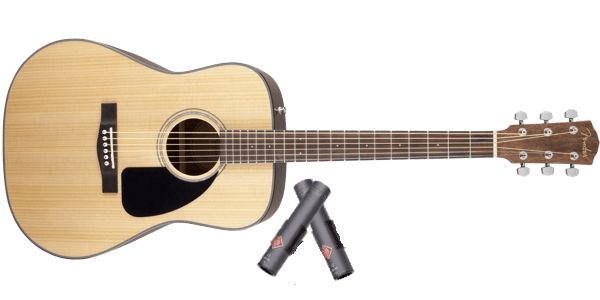
X-Y, or coincident-pair, is the easiest approach to stereo miking. If you are willing to move the mics around a bit to find the sweet spot, you’ll find it’s hard to make a bad recording. X-Y miking produces a much narrower stereo image than the spaced-pair techniques.
But it lends a smoother, warmer, and more natural sound to the acoustic guitar. Place the two mics close together so that their capsules are almost touching.
The rear ends of each mic are spread apart at an angle of roughly 90 to 120 degrees. The result looks like a wide V shape, with one mic’s capsule positioned directly above the other.
The 3-to-1 rule doesn’t apply to the X-Y technique because the two capsules are so close that sound waves arrive at both at essentially the same time. Thus, minimizing objectionable phase cancellations.
To start, try placing the two mics opposite the 12th fret of the guitar. If you have a really nice-sounding room to record in, try backing the mics up to a distance of one to two feet from the guitar.
This will capture more room tone and yield a more natural sound. While the best-sounding position can depend upon the guitar, the room, or the mics.
Typically, placing the mics around seven inches in front of the guitar’s 12th fret will tend to de-emphasize midrange frequencies.
That’s because one mic will be pointing in the direction of the bassy soundhole. And the other towards the top of the neck, an area rich in high frequencies.
Processing
Once you have everything set up and ready to go. You’ll want to do some minor but important tweaks to this sound. This is usually in the form of fiddling with the EQ along with effects like compression.
I prefer to record without any processing first and once I have the recorded sound, I process it afterward.
Compression
Use a compressor/limiter to knock down any peaks (3:1 ratio). Set the threshold a little low to give it a slightly “squashed” or tighter sound.
Set the threshold higher to just limit the peaks and give a more natural, open sound.
Equalization
You may need to eq out some boominess. If so, try rolling off some bottom (100Hz), or cutting a couple of dB at 300Hz. Adding a little eq around the mids will give you a sound that is a little more “woody”.
Usually in the frequency range of 700Hz to 1.2KHz. To add some shimmer on the top end, try 8-10K. But be careful, too much will add noise.
There is often one loud annoying frequency, somewhere in the lower mids. Therefore, you will need to use a sweepable midrange to find it and cut it.
Hey, fellow guitar mate! I’m Justin, I have been a professional guitarist since 2012. I have traveled the world playing on different stages alongside some of the best indie bands, at some of the biggest music festivals in the world. As a result, I’ve played lots of different guitar gear. Instead of keeping that knowledge to myself, I have set up this site to share my honest reviews of various guitar gear. But most notably, my love for guitar picks.